The loo is one of the hardest-working items in your home. Due to this constant use, issues may arise more often than not. Can you hear the sound of running water in your bathroom that won’t stop? Or have you noticed that after you flush your toilet, it just keeps running? A running flush mechanism is probably the culprit.
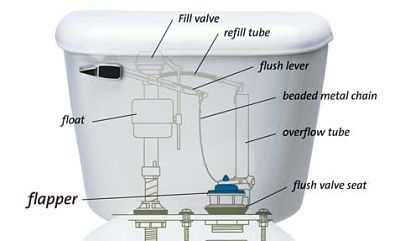
The toilet tank includes:
- Flush button or handle
- Flapper
- Float ball
- Valve
- Overflow tube
- Refill tube

The flush button or handle on your toilet connects to a metal chain attached to the flapper. The flapper controls the flow of water into the bowl when flushed. The flapper opens as the toilet is flushed and allows water to drain from the tank into the bowl.
So, Why Does Your Toilet Keep Running?
If you suspect that an internal leak causes the running water, you will need to inspect the tank and examine the condition of all the parts inside. Common causes of a running toilet are:
- Cracked or faulty flapper
- The flapper chain is too long or short
- Incorrect float ball size
- Flush button or handle becomes jammed or loose
Five Things You Can Do to Stop Your Toilet From Running:
If you are confident in your ability to do basic toilet repairs, follow the simple steps below to fix your leaky toilet. Things you might need:
- Cutting pliers
- Flathead and Phillips screwdriver
- Pliers
- Replacement fill valve
- Replacement toilet flapper
Step 1: Turn Off Your Water Supply
You will need to turn off your water supply before beginning your repairs. The shutoff valve can be found below the toilet bowl. Stopping water from entering and leaving the tank is crucial when repairing your toilet.
Step 2: Inspect the Fill Valve
Remove the tank lid and clean the fill valve with warm soapy water. Return the lid and turn the water back on to inspect if there are any leaks.
Step 3: Inspect the Float Arm and Lift Rod
The float arm should be straight and attached to both the fill valve and the ball. If the float ball is loose or not lined up with the arm, it may need replacing. The lift rod needs to allow the flapper to position itself properly into the opening. The rod can be adjusted, or a new flapper can be purchased to create a better seal.
Step 4: Check the Level of Water in the Tank
The tank water level needs to be kept at 2.5cm to 5cm below the overflow tube to allow for optimal function. If the water level needs altering inside the cistern, find the screw that sits on top of the float. Turning this screw to the left will lower the float and reduce the water level.
Step 5: Inspect the Flapper
You will need to stop the water flow to your toilet for this next step. The flapper must have an airtight seal when sitting on top of the opening, or it will cause the water inside the tank to leak out. Inspecting and cleaning the flapper will indicate whether it is functioning correctly. If needed, remove the faulty flapper and replace it. You can find these at any local hardware or home improvement store.
Still Running?
If you have carried out these steps yourself and your toilet is still running, it might be time to bring in a professional. So give The Brisbane Plumbers a call today! A licensed plumber will be able to inspect your toilet thoroughly and remedy the problem. Taking the stress off of you and ensuring the repair runs smoothly.
